Introduction
This idea started off on a whim, just seeing another video on youtube of someone who’d just bought a fearsome machine that I didn’t realize was available to the retail consumer, a Supermicro 4028GR-TRT. At that moment, I understood that I could bring an idea to life - a way to develop and run deep learning models such as the more recent 70B+ parameter LLMs locally (such large models struggle to run on a single average consumer model GPU, so often, cloud platforms are used to run them). That isn’t to say I’d be training a 70B parameter model from scratch, but being able to develop and train models of any kind locally is a fun feeling.
That’s really all this was - there is no inherent need, but lots of fun and learning to be had, so that was enough for me to start.
I learned quickly that enterprise-grade servers were not designed to be quiet. So before even plugging in the server, I knew I’d have to address this noise level to make it work for my one-bedroom apartment. That led to buying an APC NetShelter soundproof cabinet on Facebook Marketplace. I rented a box truck from Home Depot, drove a couple hours, backed the truck down a driveway with only a few inches of clearence between concrete steps on one side, and a boat on the other, and three of us pushed it up the loading ramp in a way that would cause one to recall Sisyphus and his boulder. With the cabinet strapped in, we (Dad and I) left the driveway as carefully as we entered, again sans boat damage.
Upon returning to center city Philadelphia, there was no place to park, so naturally, I parked on the sidewalk next to my apartment and hoped a policecar would not drive by in the near future nor would any pedestrian take issue. Since the cabinet was 200+ pounds altogether, I disassembled it as I could, which meant removing the back fan module and the top counter, and then channeled Sisyphus again to get that box up three flights of narrow stairs. It was a miracle that we could maneuver up the stairs with an inch on either side at one point. Minimal scratches to the cabinet, the stairs, and the people moving the cabinet!
With the cabinet in its destination, I racked the server, connected all four of the 2x2 redundant power supplies, and hit the power button. The server started it’s boot sequence with perhaps a 30% fan speed, at which point I shut the cabinet doors to get a sense of how much noise would be dampened. Strike one, it was not only still quite audible, but the quality of the noise was something that could not easily be ignored like an air conditioner or refrigerator. Then, the fans ramped to 100% and I was worried for my neighbors’ comfort.
My initial cope was that the server would be running at low fan speeds most of the time, but after running some initial training benchmarks (training ResNet-50 on a P100), I realized that the necessary fan speed for that task would render the server noise level untenable, even just one GPU with a reasonably small task. At this point I realized there was no way to make this work, especially with more (in number) and more powerful GPUs. It was time to plan how to liquid cool this server, so I could spread that heat out over a larger area and remove it with larger and quieter fans.
I had zero idea about where to start here, so I started poking around with searches like “how to liquid cool server”, etc. And stumbled across ModMyMods, a shop in Rochester, NY which specializes in liquid cooling solutions, and even offered off-the-shelf kits for server watercooling. I reached out and spoke with Austin there, and we proceeded to exchange many emails to figure out what sort of heat dissipation equipment would be required to run the server with eight GPUs.
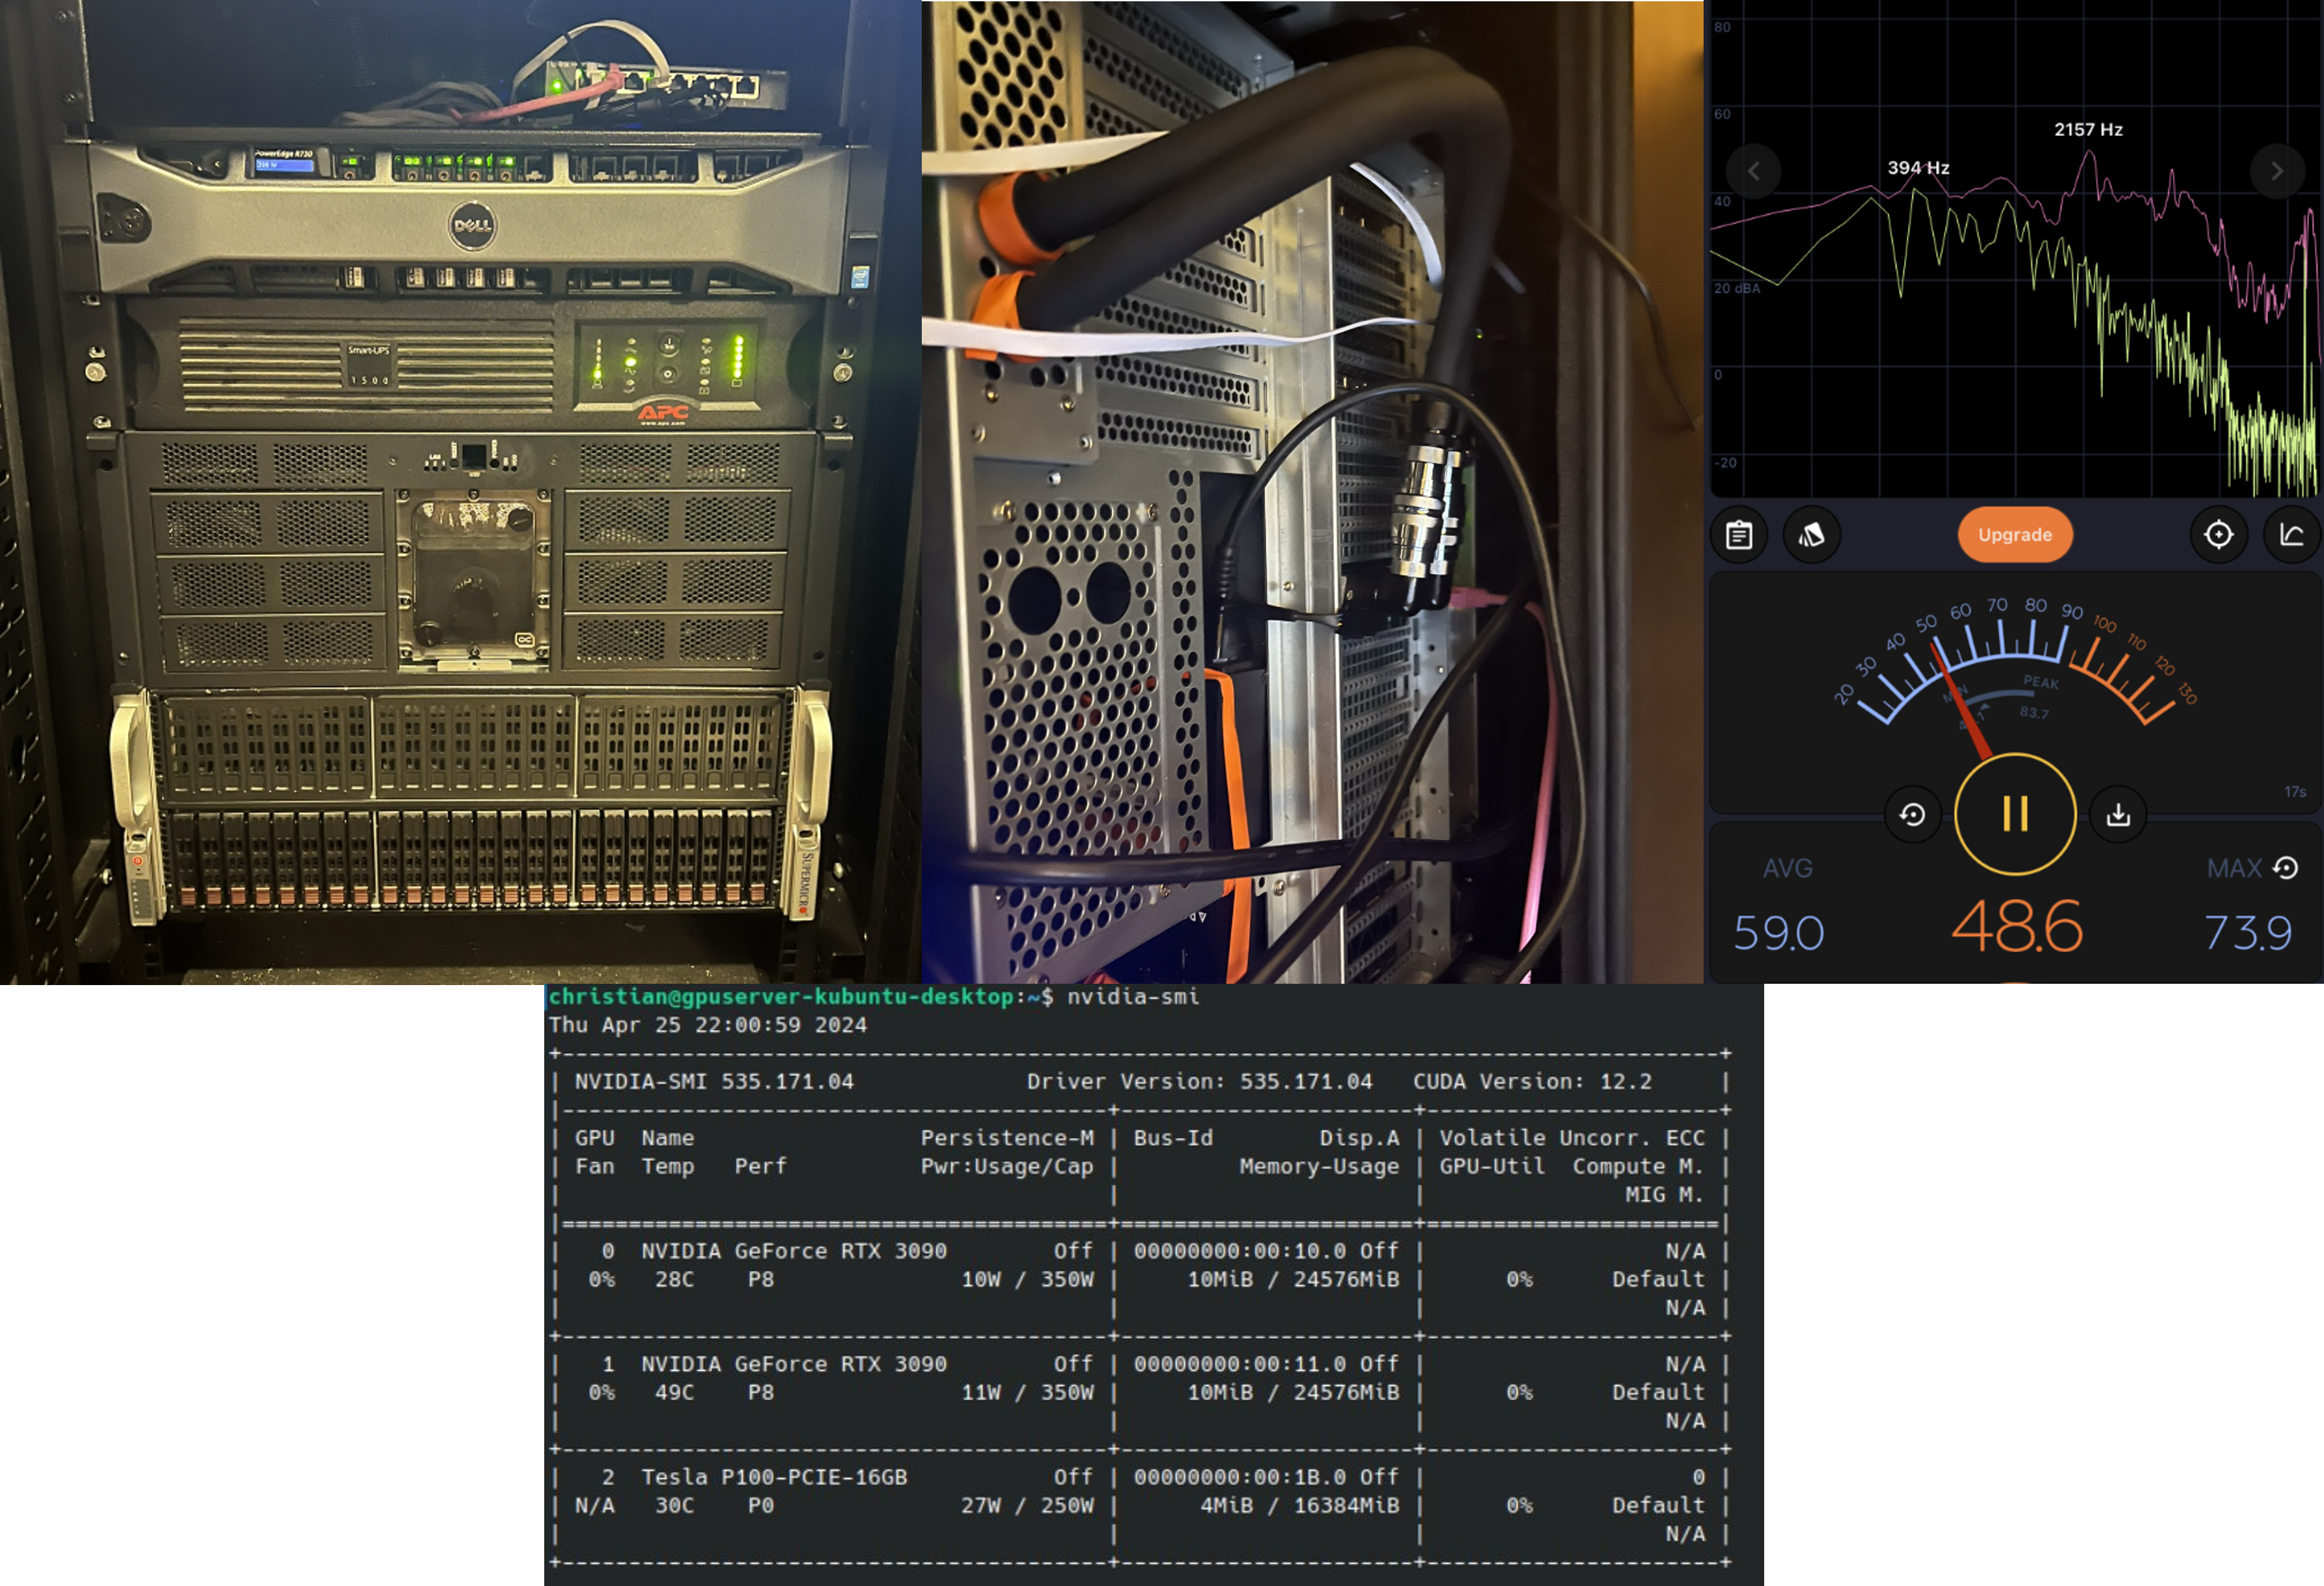
That led to the build that follows. Many learning moments, blood, sweat, and a couple tears later, the server is up and running inside that same soundproof cabinet, which is hardly needed now with how much quieter it is.
Materials
- Supermicro 4028GR-TRT Server. 2x E5-2683 v4, 128GB DDR4 ($1350)
- APC NetShelter Soundproof 18U Cabinet + related truck rental. Bought on Facebook Marketplace ($850)
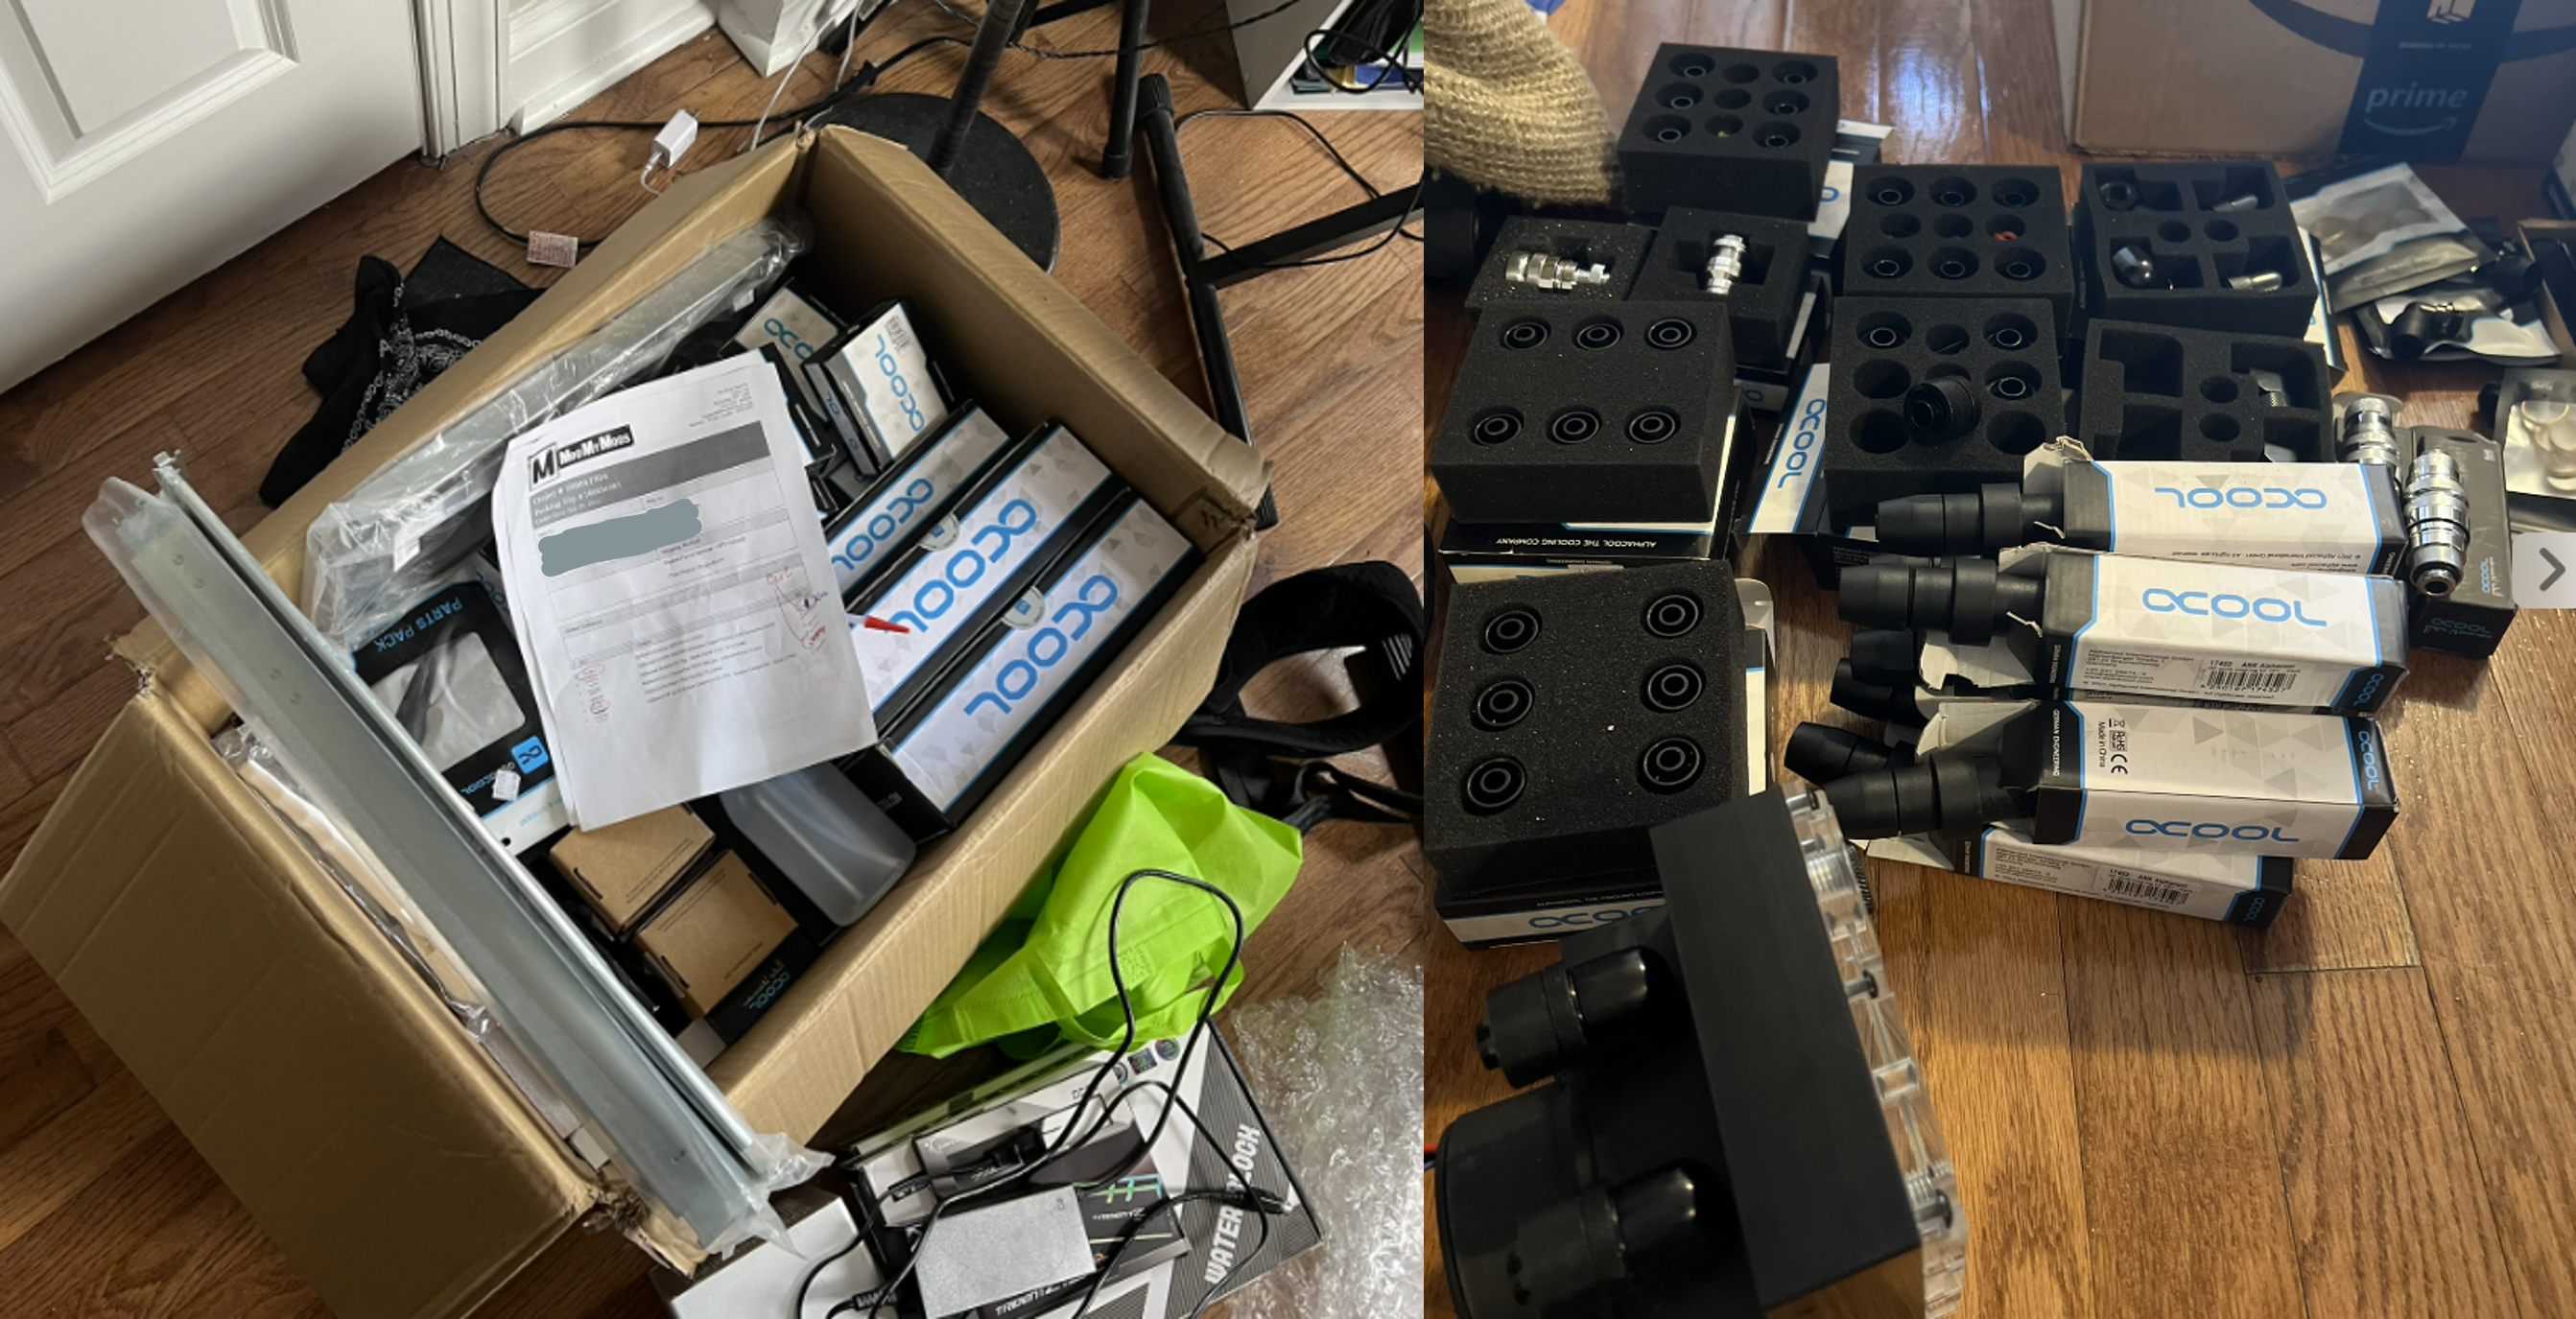
- Liquid Cooling System Components. Bought from ModMyMods ($2200)
- 2x NVIDIA Tesla P100 GPUs ($320)
- 2x Zotac NVIDIA RTX 3090 Trinity GPUs ($1740)
- Misc. Power adapters/connectors, cables, fans, organizational equipment ($180)
Total: $6640
Design and Assembly Process
In my case, rather than install a motherboard in the same case as the pumps and radiators, the plan was to house all cooling equipment in a separate 4U case, and use quick-release fittings to connect the cooling case to the server. I started with the cooling case to get familiar with the components in a case with more free space, and away from components I could damage.
The first step in assembling the cooling case was to understand what I’d just ordered! I was not well-versed in how any of the fittings, tubing, pumps, etc. would work or how they’d fit together, so I was bearing that in mind as I started assembly. I first asked Austin at ModMyMods for some guidance on how to assemble the cooling case, and generally how to retrofit the cooling equipment into the Supermicro server and received some helpful picture-guides of a similar cooling case they’d built.
GPU Water Block Conversion
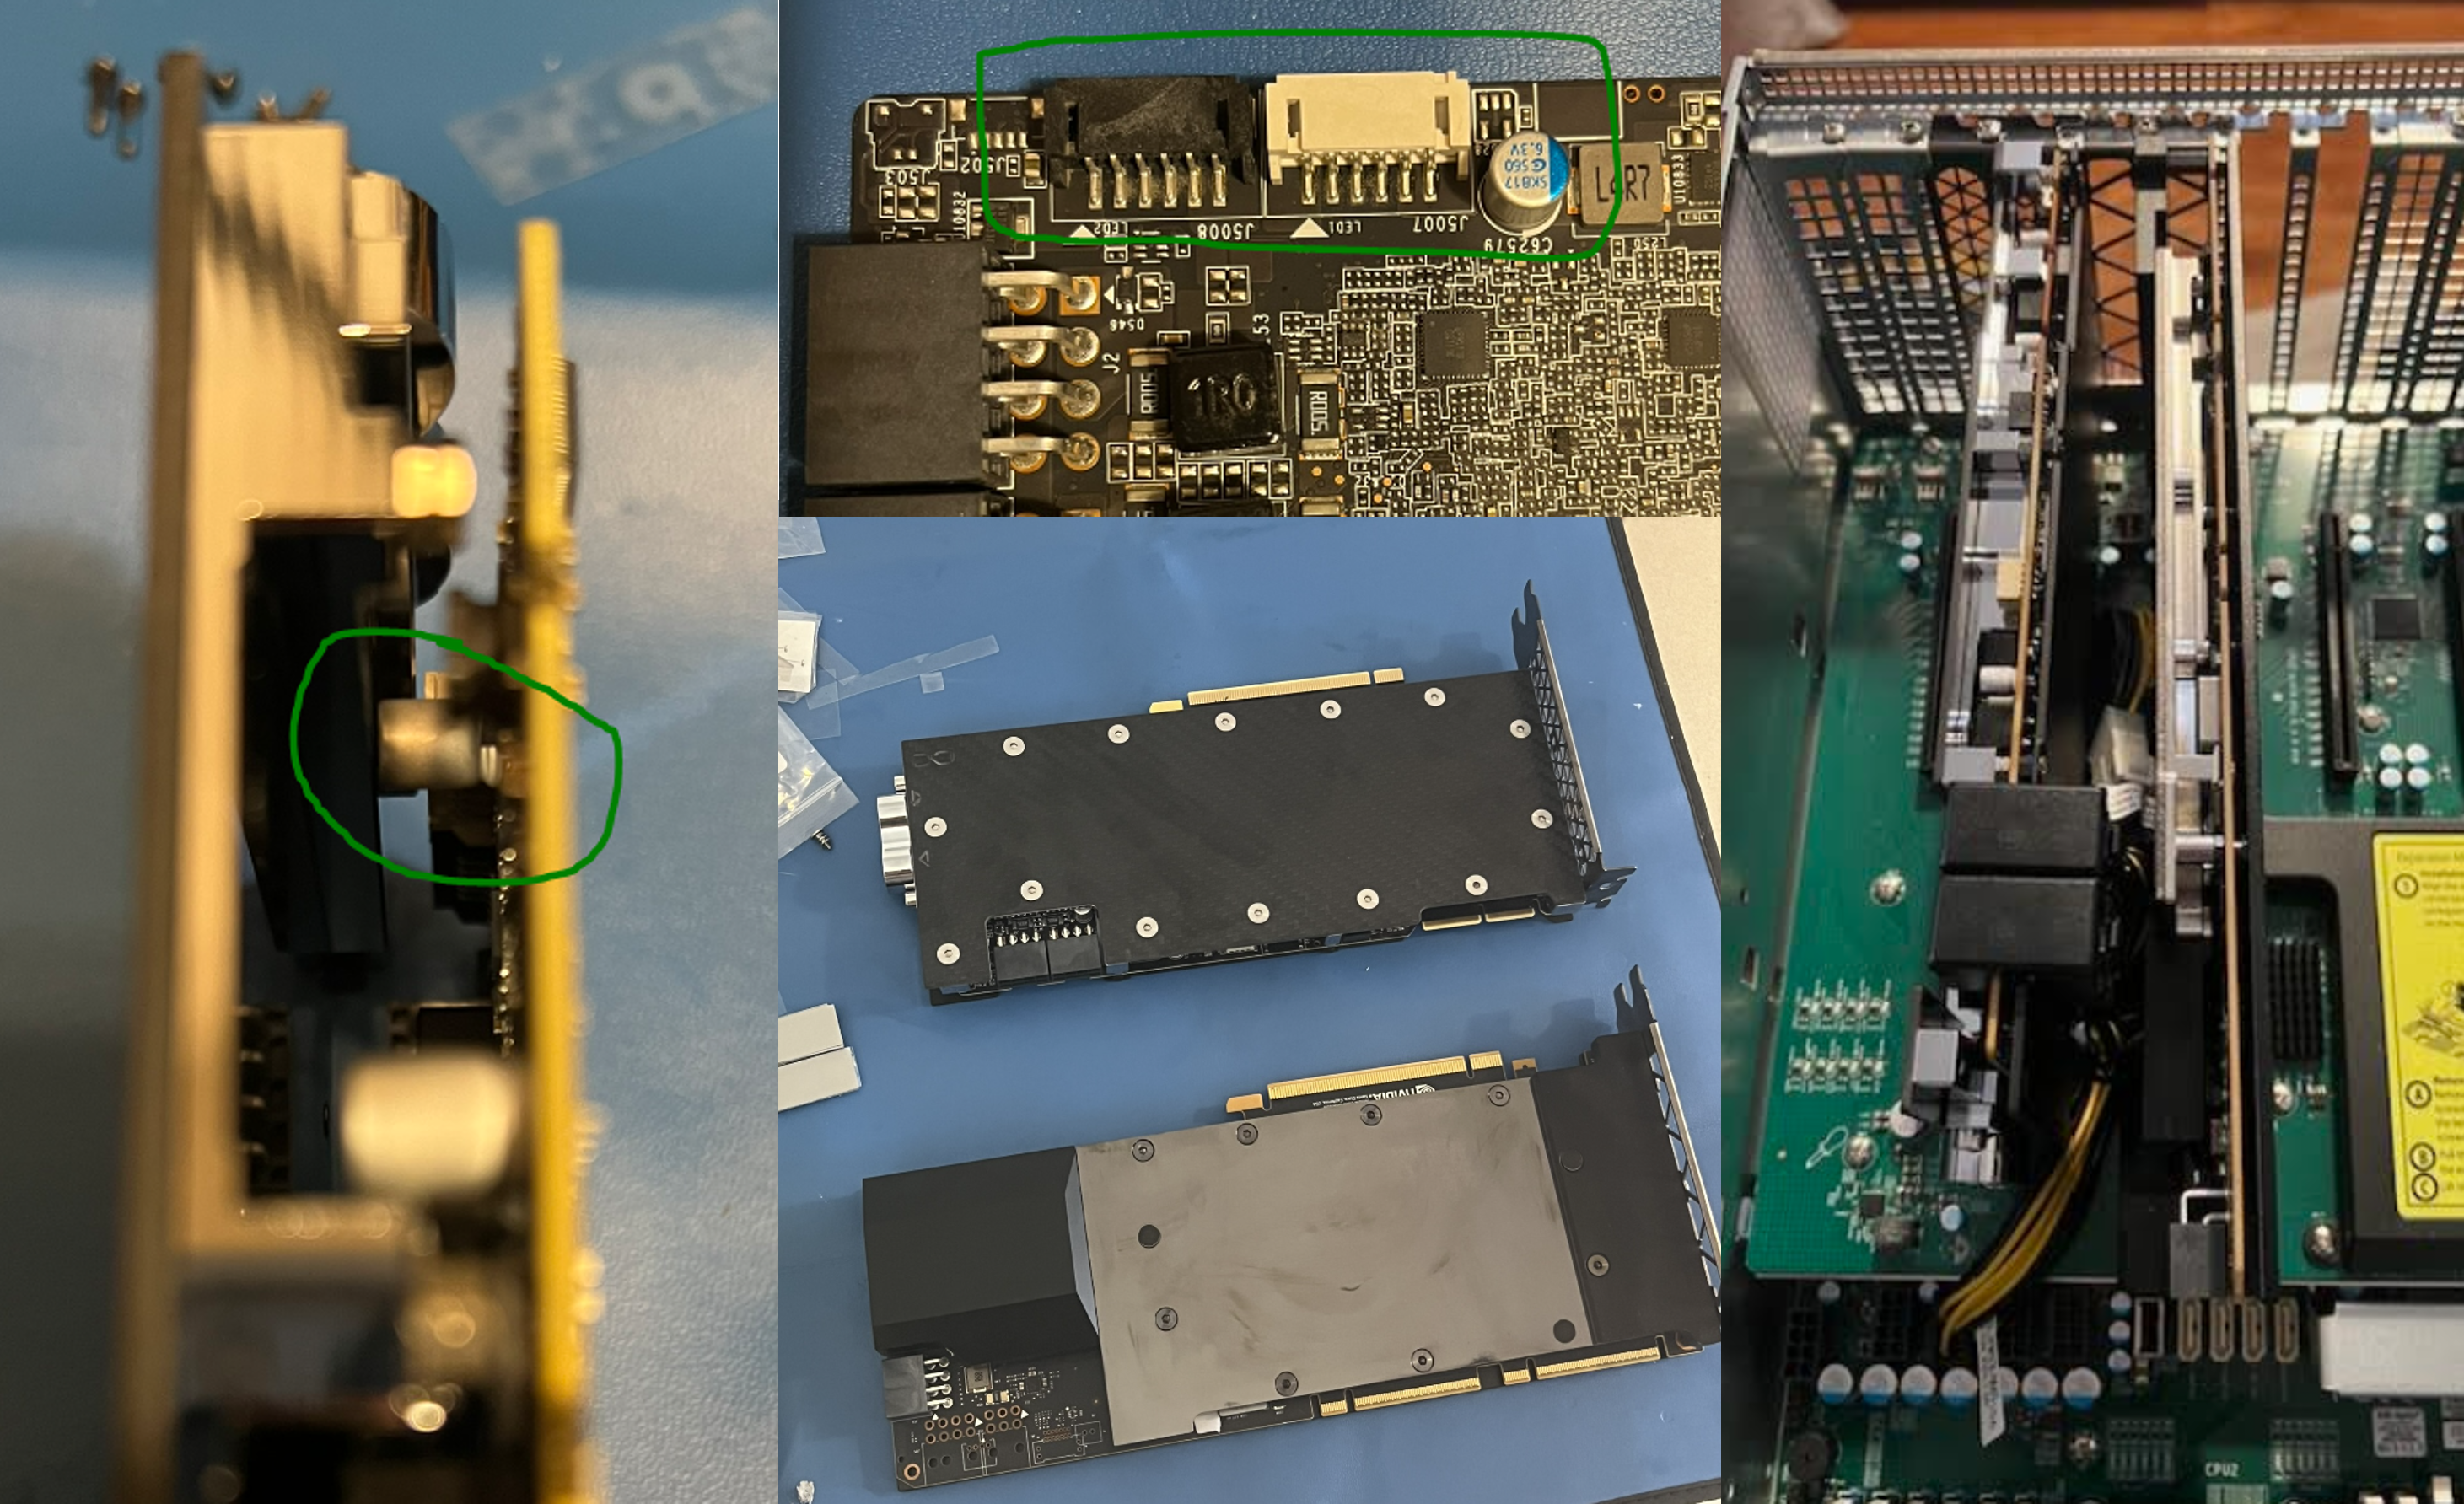
Before assembling the cooling case or server, I removed all the cooling components from each of the GPUs I’d purchased, and installed water blocks meant for each type of GPU. I was recommended Alphacool for the 3090 (reference) boards, and Bylski for the P100s. This was largely by-the-book with one exception - the 3090 “reference” as produced by Zotac has an extra bit of board at the far end (opposite the power connections) for powering and controlling LEDs. This initially prevented the water block from correctly mounting onto the PCB, so having taken apart the GPU, I was worried I’d screwed myself over at this point. Luckily, because it was all non-essential, the offending capacitor and jumpers could simply be removed (like pried off the jumpers with a screwdriver and ripped out the capacitor with my hand. I just snipped the capacitor leads to ensure they wouldn’t contact anything). I thank the reckless abandon of being awake at 4am and some obscure reddit wisdom for ending up with a functioning GPU rather than an expensive bookmark or decoration.
Cooling Case (Radiators and Pumps)
Given the desired heat dissipation, some additional flow rate was recommended, so I ordered 2x D5 pumps. These were mounted first - in the front of the case, which was already designed for one pump+reservoir assembly in the front-center of the case. A mounting bracket provided with the pump was suitable to mount the second pump at the right-front (facing front-to-back) of the case. Before mounting the pumps, 90-degree fittings were threaded into the pump top / reservoir. I set both pumps speed-control screws to the 4th setting of 5, corresponding to 80% speed, and then proceeded to read about how to prepare and install the radiators. Since the addition of the radiators would add some bulk, I screwed in a fan power hub next, just behind the pumps on the bottom surface of the case.
Installing the radiators is not as simple as just installing the radiators. Nooo, first, you have to learn that the radiators contain manufacturing remains (small metal chunks) which have to be flushed, lest the pumps have to encounter such debris and get damaged, or a smaller flow channel such as that inside a GPU waterblock gets blocked. This involved filling up the radiators with distilled water or a radiator cleaning solution, then shaking the hell out of them repeatedly until the out-pour contained no debris. After at least 20 tries of this and tired arms, I found a video of someone using an aquarium pump to flush the radiators, so I ordered the pump, and left the radiators to flush for a weekend. I recommend this, because there was additional debris removed, and I’m glad it’s not causing trouble within the server cooling loop now.
With the radiators flushed, they could be installed into the cooling case. This was done by attaching one radiator and three 120mm 3000 RPM fans each to two mounting brackets which were designed to screw into the side walls of the cooling case. I wanted to space the radiators out as much as possible, because putting them inline with each other seemed like it could harm cooling capacity (negligibly, as it turns out). However, given the holes in the case, there was only one logical placement for the radiators, which left only a small distance between the two assemblies, so I went with it.
The tubing setup was straightforward for the cooling case. Since I’m filling from the reservoir, the loop could be considered to start there and proceed thusly: Reservoir, Pump 1, Server, Radiator 1, Radiator 2, Pump 2. I cut tubing and prepared fittings for each section of tubing, tightened things as much as I could, and, since I’d left the radiator assemblies unscrewed to allow for some movement flexibility, then screwed these assemblies into the sidewalls of the cooling case.
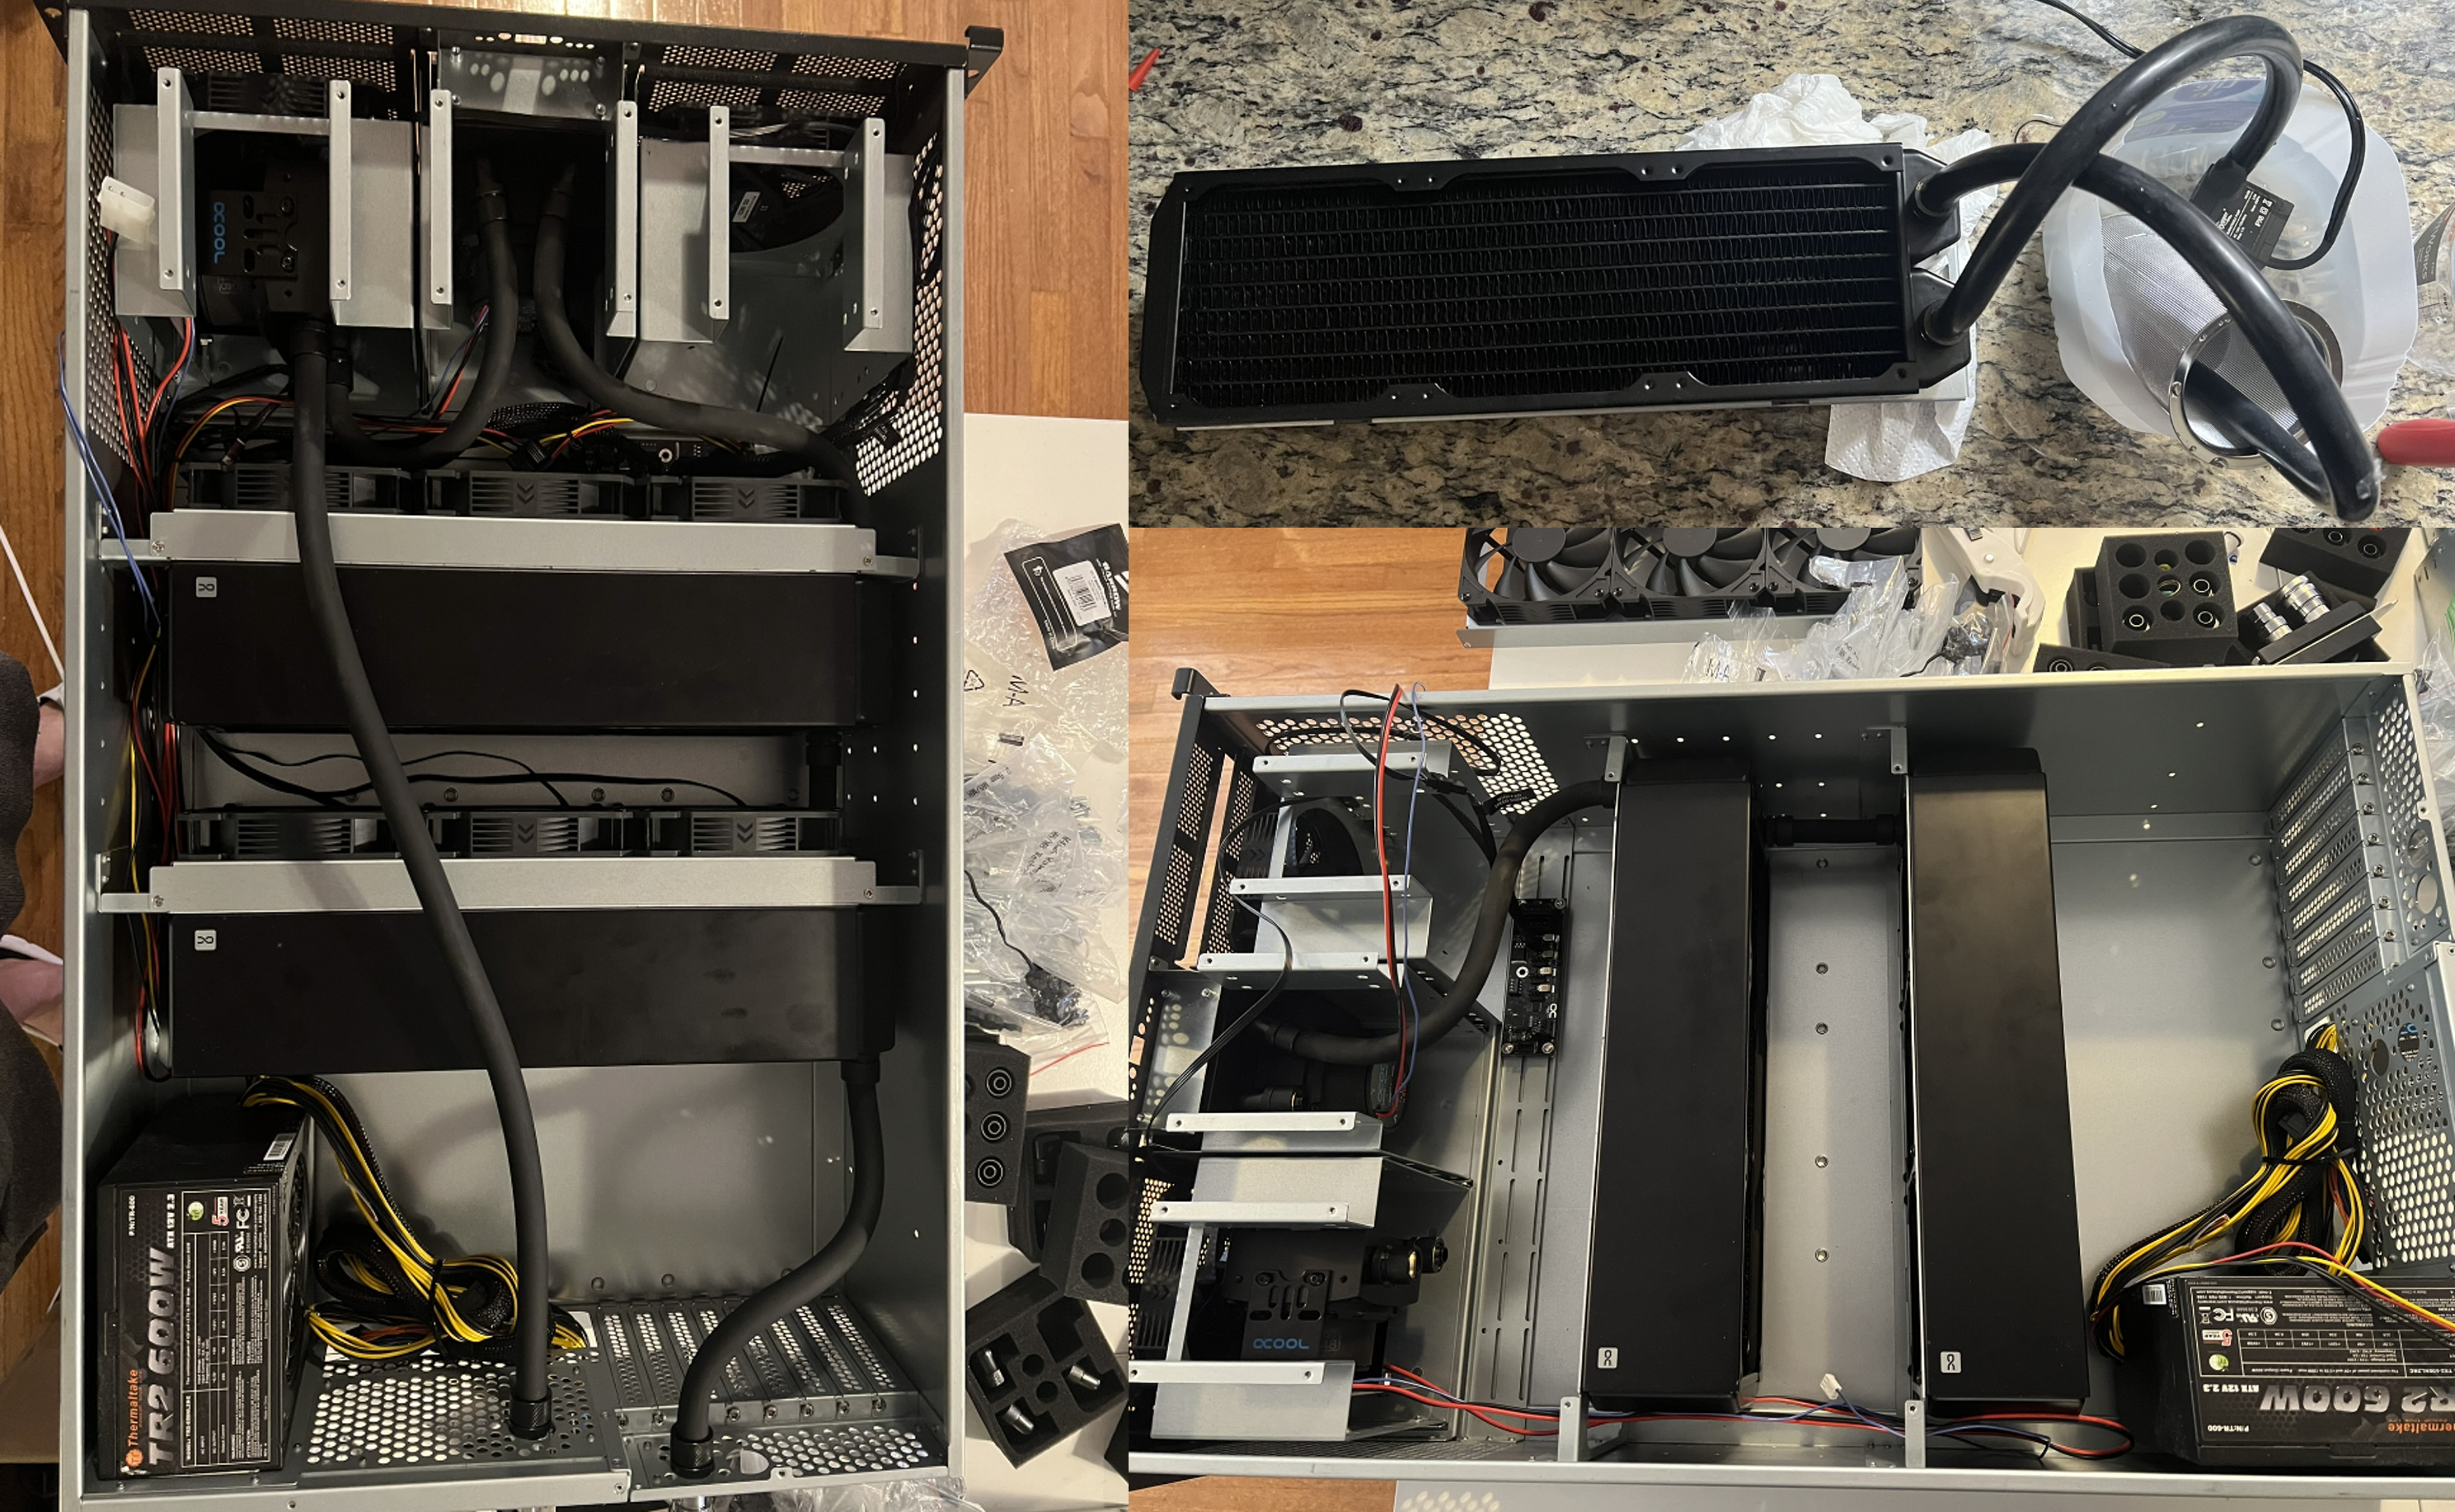
This wrapped up the cooling case assembly, so I then pressure tested what I’d built so far. After attaching quick-release fittings to the inlet and outlet for the cooling case, I attached a pressure gauge and pump to the inlet and applied 0.5bar pressure. The goal was to maintain pressure for >10 minutes, which it did! The next step was to add water - so I added distilled water to the reservoir, connected the inlet and outlet of the cooling case to form a loop, and turned on only Pump 1 which was connected to the reservoir. After a few on-off cycles to fill the loop and maintain the reservoir water level, I left Pump 1 on and then turned on Pump 2 (it’d be bad to turn on both at the same time, since these pumps incur damage quickly when the impeller isn’t submerged - make sure it is!). I then left the loop running for a few hours to check for leaks, and to ensure that the loop was running smoothly. I plugged the fan hub into the makeshift molex power adapter I’d attached to an old ATX power supply and the fans came to life as well. A day passed, and no leaks. Awesome! Later, after all was working, I bought a smaller dedicated PSU for the cooling case, to avoid using this overkill 1000W ATX PSU, and that is how it’s stayed since.
Server
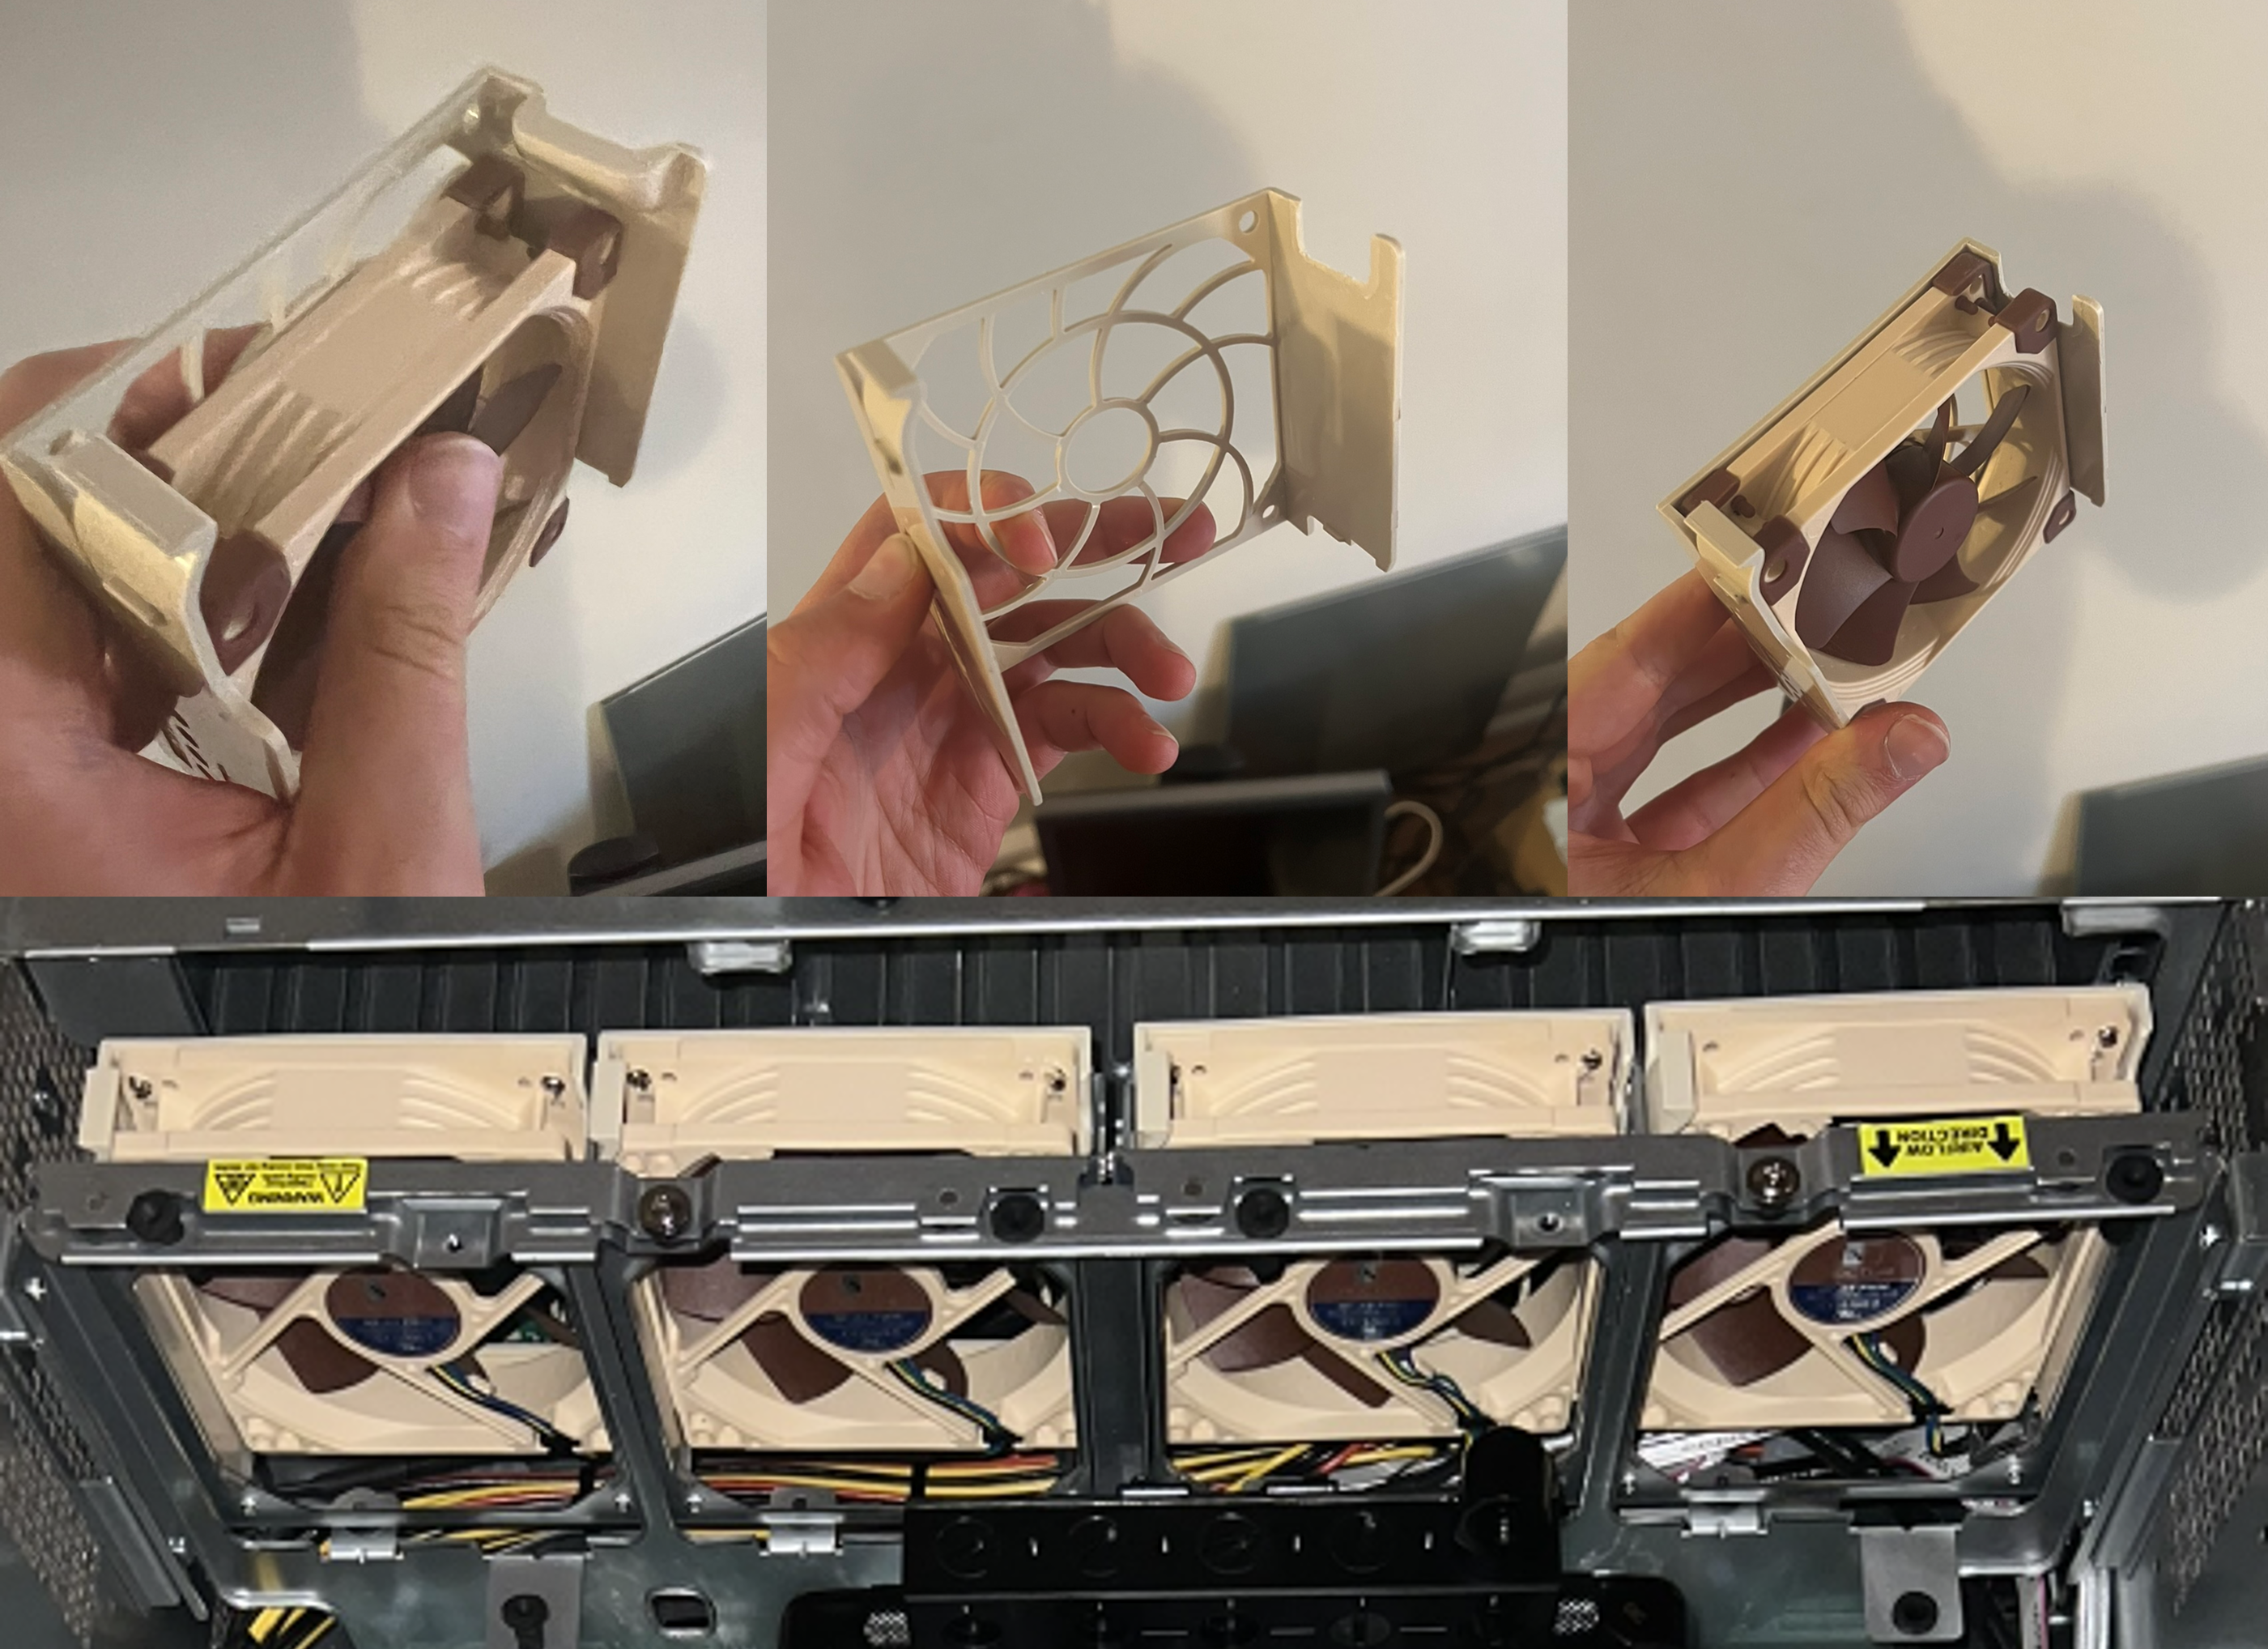
I’d never seen this done before, and had no concrete plan, so I knew I was in for a challenge of forcing this server into a life it’d never imagined given the jet engines used to cool it in it’s creator’s plan. I had two main loops to consider - one for the CPUs and one for the GPUs. What I knew made sense straight away was that I wouldn’t need the same fans which came with the server (nor would I want them, they’re the source of the annoying noise), so I bought four 92mm Noctua fans and modified the existing fan trays to fit into these.
This bought me some case space. The next obstacle to overcome was the placement of the distribution (“distro” as the water-cooling experts say) plate which would receive the inflow from the cooling case, and distribute it through each of the CPU and GPU loops. This part needed as much distance from the parts to which it was distributing as possible to make the tubing runs doable without kinking the tubing. Luckily, with the 2nd row of four fans no longer in place (facing front-to-back), I managed to combine two sets of brackets provided with the plate to attach it to what used to be mounting holes for a metal place which held the fan trays (very lucky that these geometries lined up and I could bolt on the bracket assembly).
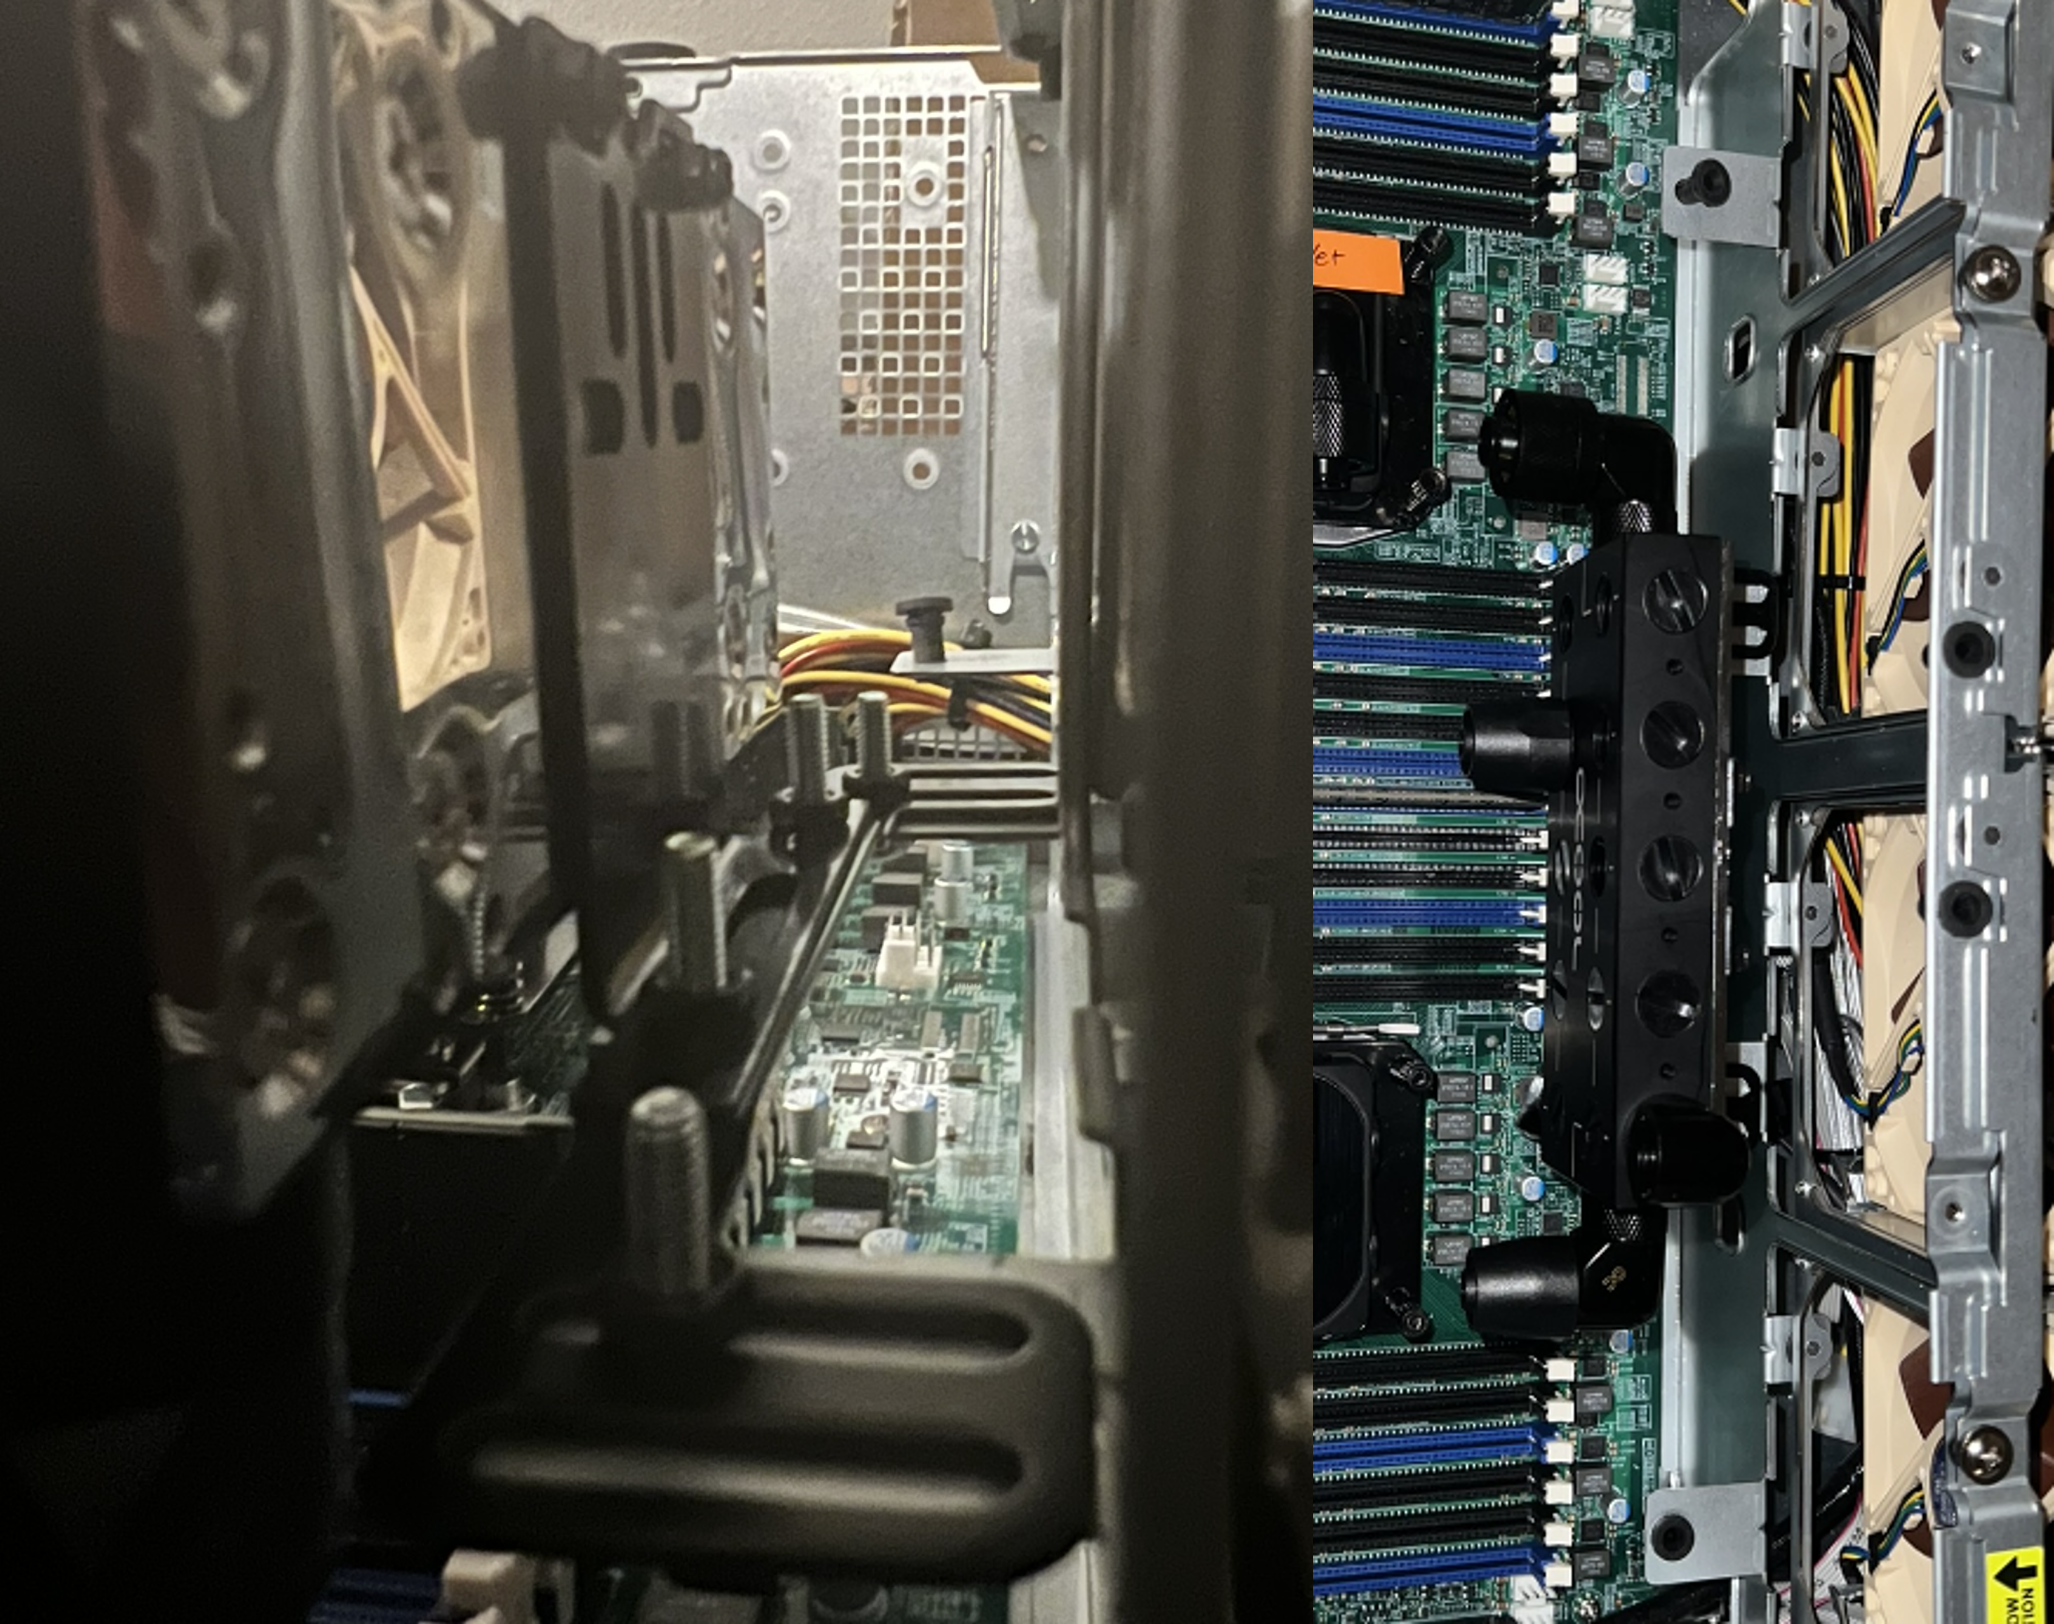
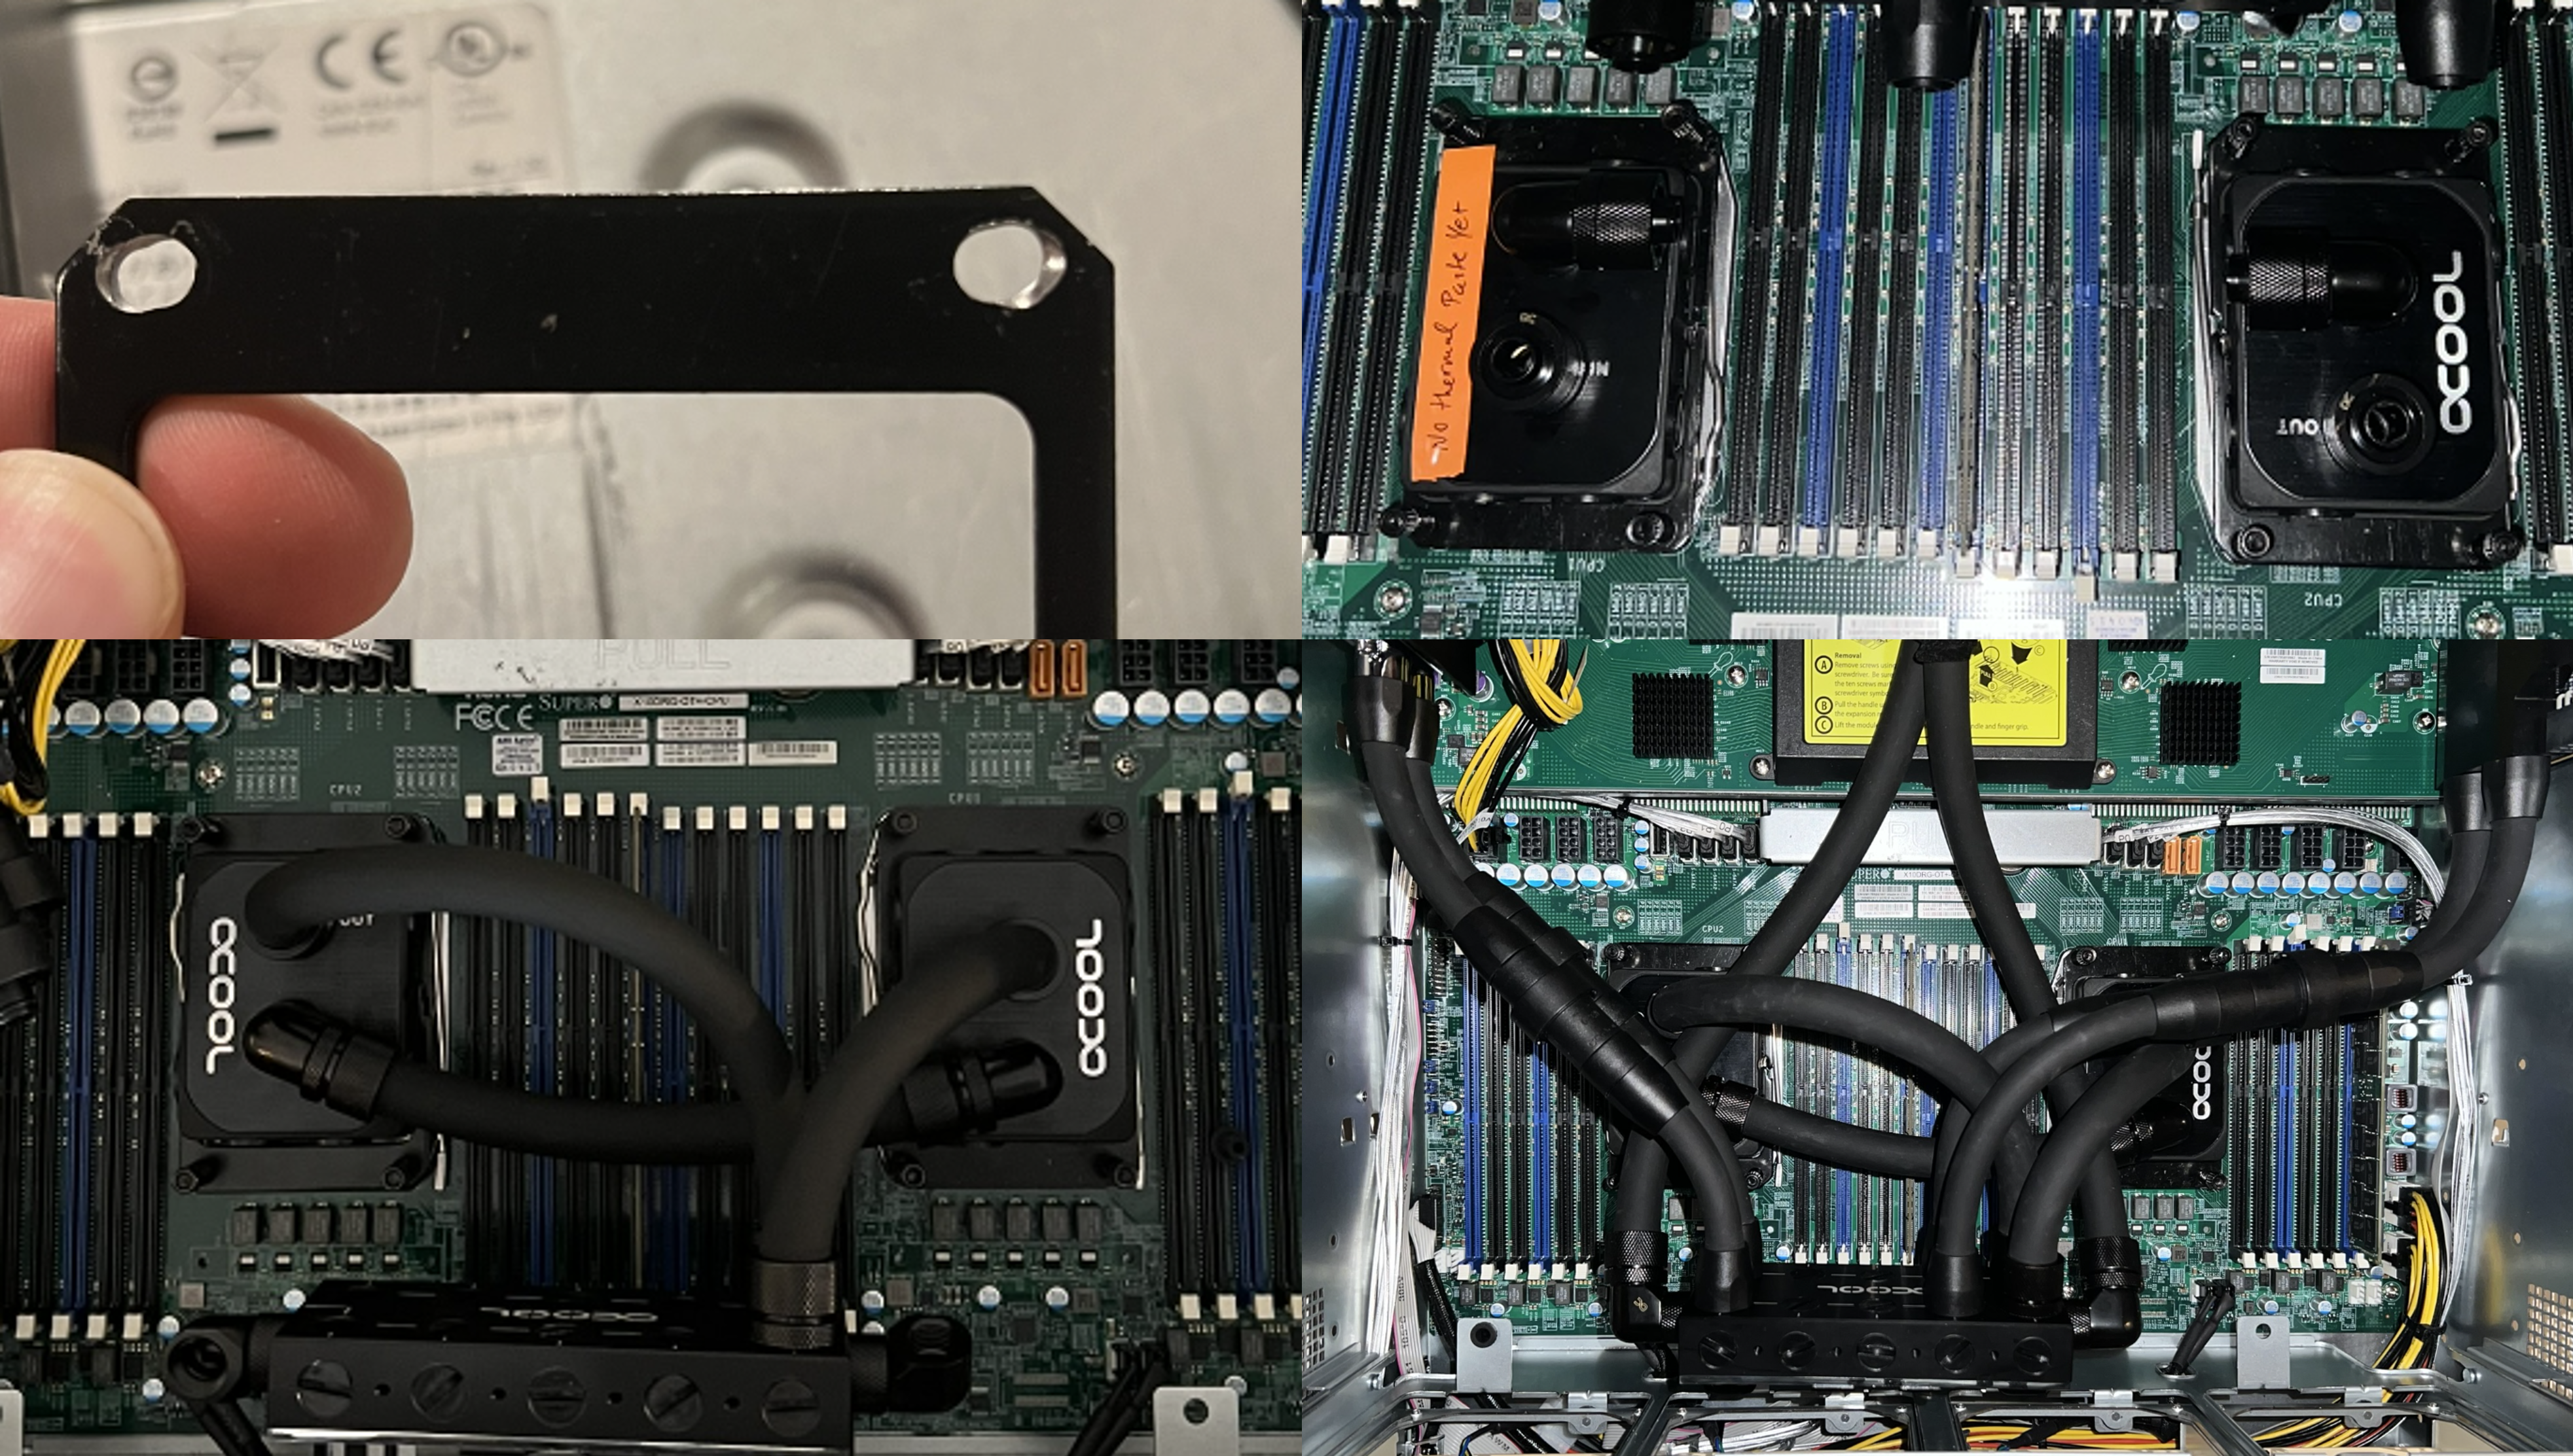
I could roughly imagine the tubing routes from there so called that an adequate spot for the plate and broke open the CPU water block packages. There were mounting brackets here which supported FCLGA2011 sockets reported as the type used for the two Xeon E5-2683 v4 chips, but after screwing the threaded posts into the motherboard to test the bracket fit, I realized Supermicro created a proprietary setup for the mounting holes, such that the provided bracket meant for FCLGA2011 just barely didn’t fit. After a bit of drilling, that was no longer a problem, and I was able to spread some thermal paste and get the two waterblocks mounted.
I decided to run the tubing for the CPU loop before installing any GPUs, so used the larger 16/10mm tubing and corresponding compression fittings to run the loop from the distro plate to CPU 1 inlet, from CPU 1 outlet to CPU2 inlet, and from CPU 2 outlet back into the GPU loop inlet on the distro plate. From there I installed two GPUs, one P100 and one 3090, on opposite sides of the server daughterboard with eight x16 PCIe 3.0 slots. I just started eyeing up the tube paths, considering that each GPU i/o tube would need a quick-release. While the compression fittings for the larger diameter tube were metal and used relatively thick brass compression rings, the nylon fittings for the smaller 12.7 / 7.6mm tubing made use of thinner (like razor blade thin) compression rings, with hooks that were meant to dig into the tubing and lock it in place. You might see where I’m going with this - I made three deep slices in my fingers in one motion trying to manipulate tubing. That is why I say blood, sweat, and tears went into this! 0/10 would not recommend - be careful with these!
At any rate, the tubing was run for the first two GPUs, sans the connections to the distro plate. I first pressure tested the CPU loop only with the other distro plate holes sealed, then added the GPUs, and did the same. With all looking OK, I added coolant and let the pump run for a day to check for slow leaks again. Waking up to find no leaks, I added one of the stock 3090s to a free slot for comparing temperatures between the two 3090s. The server fired up perfectly, and it was a relief to see it work after months of planning, waiting, and assembling.
After some time confirming things worked as expected and installing Proxmox, I installed the remaining two GPUs, another P100 and the second 3090 with a newly installed water block. A nusicance came along here - the second P100 was recognized as a device to assign to VMs but whenever I’d try to use it inside a VM, the whole machine would crash and restart. After confirming the same phenomenon with other GPUs (despite the stock 3090 working in this same slot just days before!) I postponed dealing with this problem and re-ran tubing to move that P100 over a slot. That will be a problem for when I have seven GPUs and need to install an eighth.
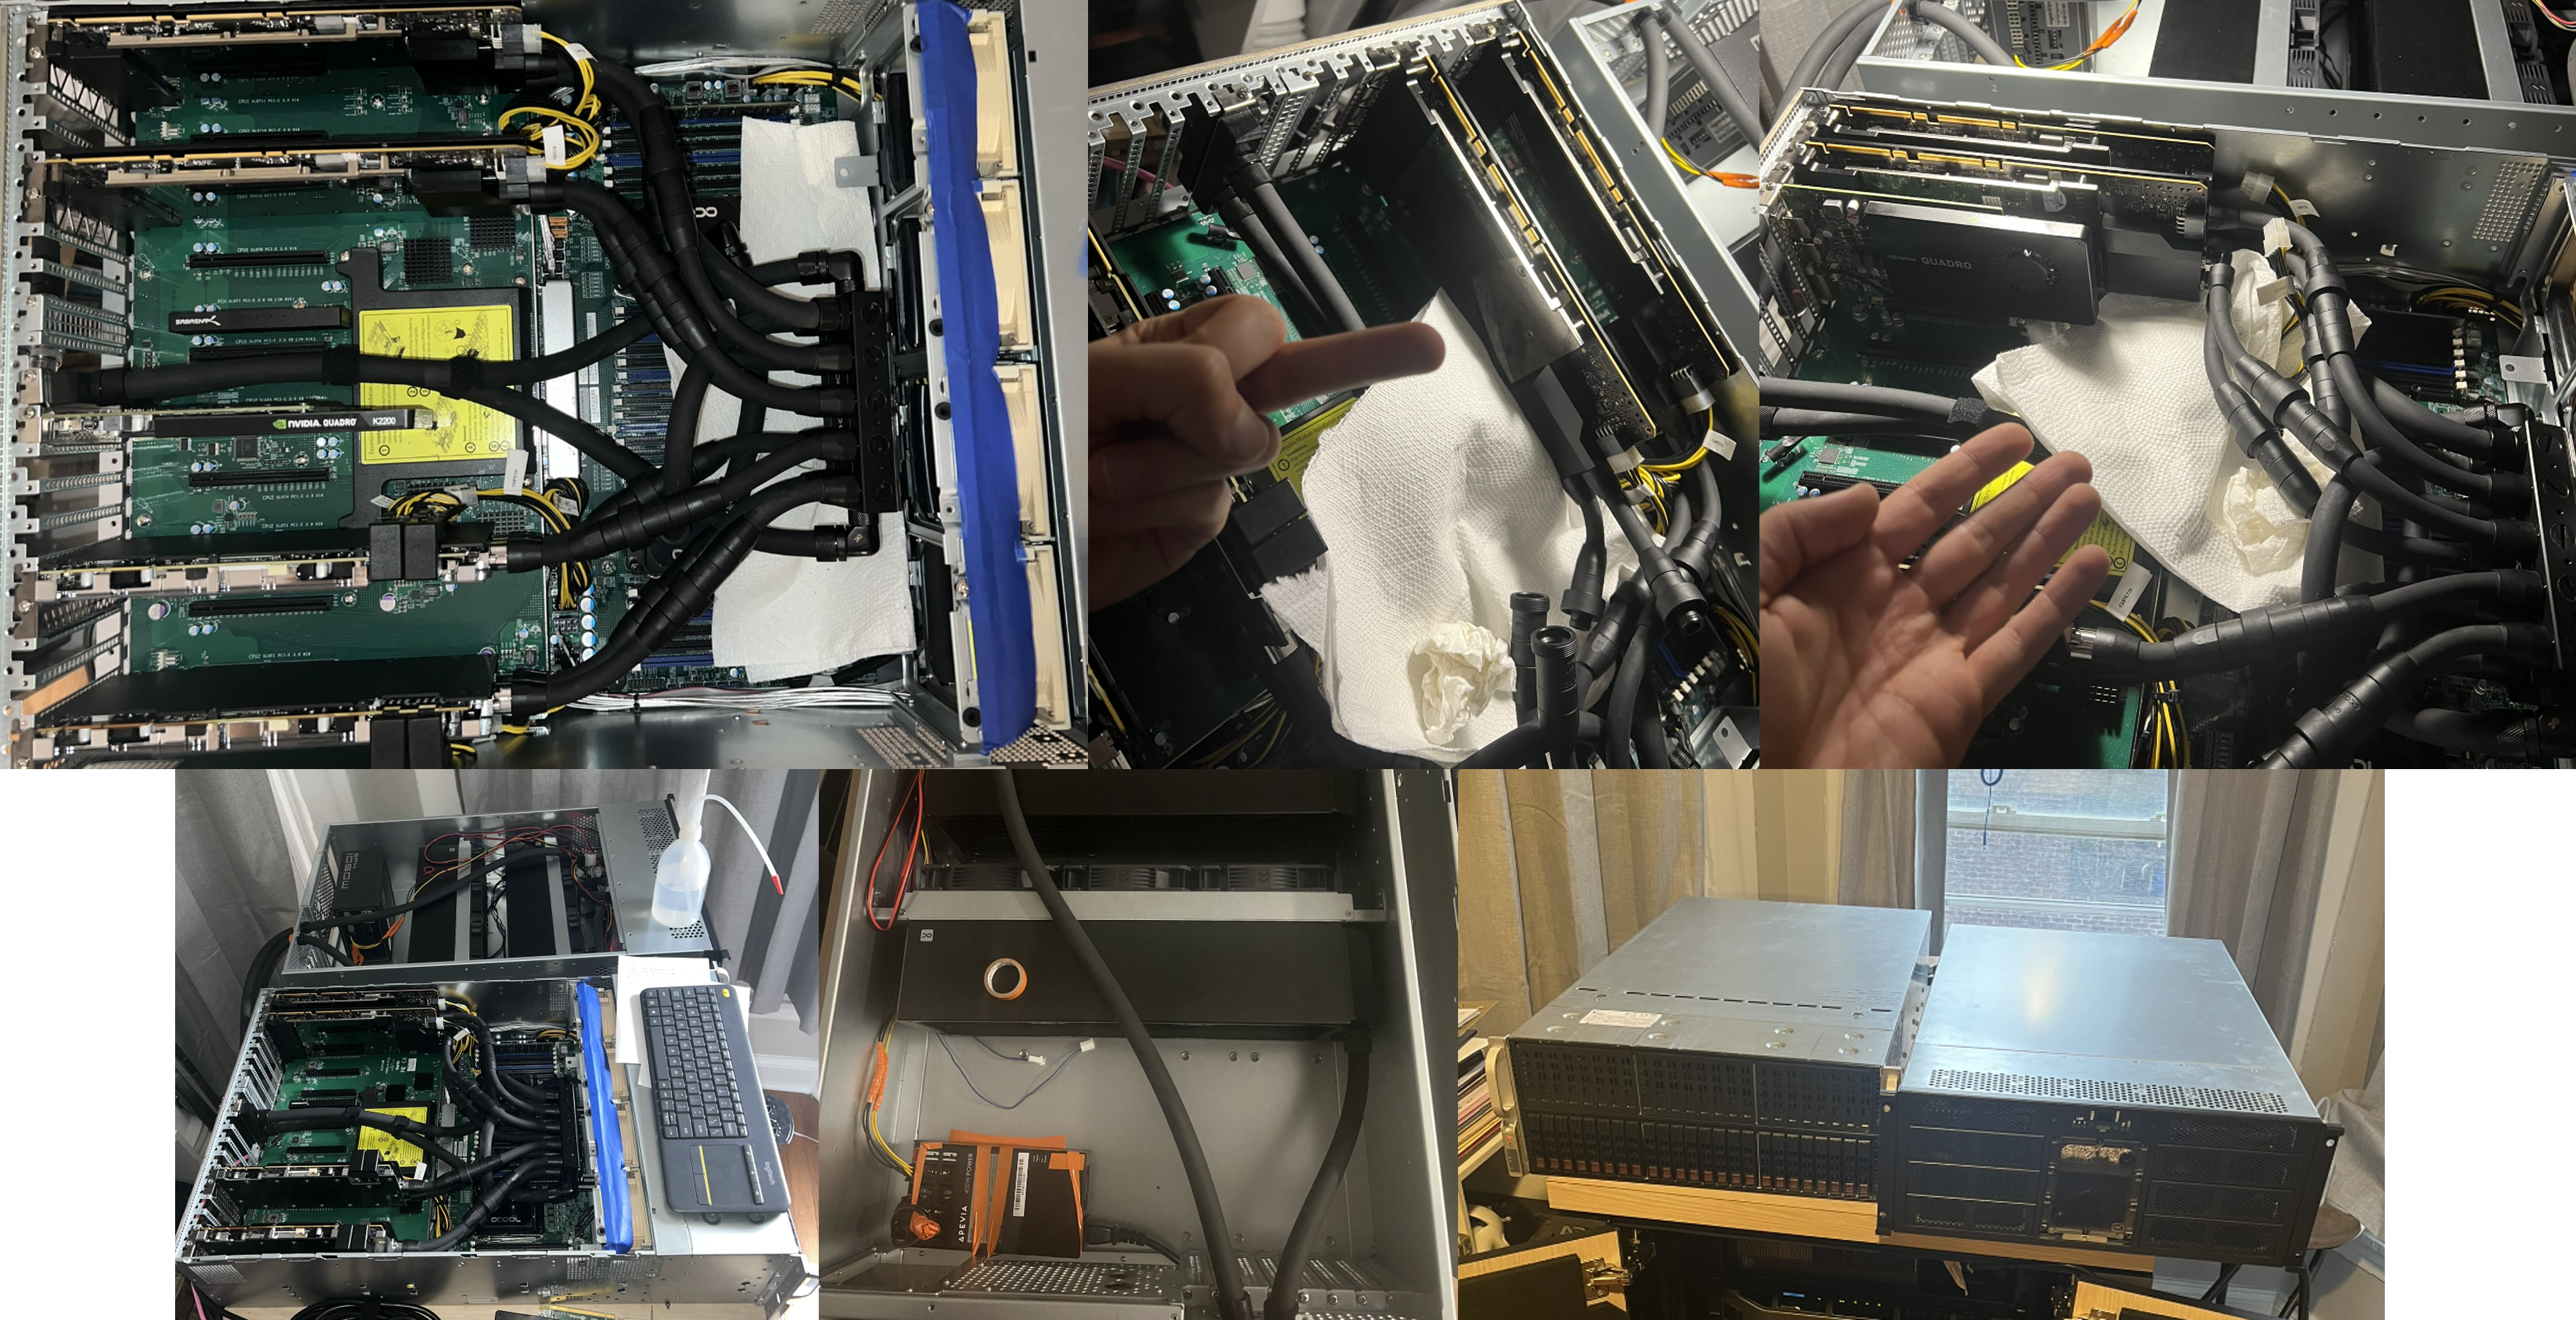
With four functional GPUs now installed, I ran some basic training benchmarks against Kaggle notebooks, such as training runs for playing card classification, etc. Performance was maybe 10% slower than the Kaggle notebook at worst, but largely usable, and local which I like. Next, I’ll look to benchmark training runs with large models or batches requiring multiple GPUs to see how this server fares against a similarly provisioned VM in terms of GPUs. I’ve no reason to believe PCIe 3.0 is the limiting factor for speed, perhaps RAM or the CPUs which are not terribly speedy. I have some more learning to do to pinpoint that bottleneck yet, but all in all, this was a fun learning experience, and I’m glad to have this power right next to me to train models for my research projects and maybe can even make this small cluster (there is a Dell R730 sitting right above the GPU server) accessible to friends remotely.
Happy to provide more detail or a part list if you’re interested.
Lessons
- The thin brass compression rings will RUIN your day and make grabbing things painful for weeks. Treat them as knife blades.
- Reread (1).
- Flush Radiators with much shaking and aquarium pump
- LED cap and jumpers can be yeeted
- This rig will be obsolete soon enough, but having built this without having to take out loans will prove valuable in building anything more powerful and expensive later with modern components.
- Water can evaporate slowly through the tubing. I thought I had a slow leak, but could not find anything. Turns out, the distilled water portion of the coolant can evaporate through the tubing.
Future Work
- Waiting on Cheap A100s, or a need for more GPUs (I need to put this to work!)
- Training smaller GNNs for structural simulations
- Making this mini-cluster accessible to friends and coworkers